Saturday, January 18, 2014

Nomads: It Only Takes one (RED)

Nomads was my first faction for Infinity. I started playing the faction not because I particularly liked them more than any other, it was the only faction in the group that had yet to be represented. It just so happened Nomads are one of the more well rounded factions available to play with.

The collection of models has grown over the last year and a half to include a large majority of those available to the faction, mainly lacking a few support models I rarely play with at this point. What I do not have is a painted force. I started a test moderator over a year ago and have since stripped and painted it four times looking for a scheme I enjoy painting and that I can consistently paint.


This relates back to kicking the rust off after more than 3 years of very little painting (plenty of gaming though!) I believe I painted this model somewhere around June of 2013, so not too long ago. I went with a fair amount of washing and little highlights that don't show up under these lighting conditions. I really need to set up a light box for this kind of thing...

I settled on a scheme that is still Nomad like in that it carries the Red, Black, and white colors, but switches where those colors appear on models depending on their status within the army and what I feel like painting.


Here is a good example of swapping the dominate colors around for a for unique look, but still maintaining the scheme and faction unity. This model was begun around the same time that I finished the Moderator test piece. It really shows in pretty much every part of what I thought was OK a few months ago. Now compare the reds on the single should pad I messed around with about two weeks ago to the reds I painted on the Moderator. Happy with the improvement so far.

Now lets get to something I painted about 4 weeks ago (and one of three models I managed to completely paint in 2013) ... a small KrazyKoala for one of my Moran Massi Hunters.


Now I was fairly happy with how this model turned out, including the base. The parts that really didn't work out so well, were the gems and OSL I failed miserably at for the eyes and "Mouth" area. I think I hit a block of not wanting to ruin otherwise acceptable paint job trying to kick rust off of that too. I am tweaking my airbrush in hopes of taking areas like that I can achieve a much better result with less effort.

These pictures are not kind, but in a good way for me to really see where I dropped the ball on technique and thought "That looks good enough." There are areas that stick out as poor (to the standard I want to achieve) i.e. the stomach plates and arms having a pink strip that has no blending and just shows up. The only way I am going to get better and really get a feel for technique is to paint as much as possible, to the best of my ability at all times until it just happens that way.

I made I few decisions for the Nomads paint scheme. I will use metallic paints, I don't have a very good NMM technique and I'd rather just paint a bunch of random stuff learning than try it on an army I would like to have fully painted by NOVA 2014. I not only want a painted force, but I want something that can compete for Best Painted. I feel I can have a good showing at an army level, just a personal goal for 2014.

Tohaa: Conspiracy of Color

When I left off I was struggling with what was my next step. As you can see, I sort of just started shotgunning colors onto the model. The Emerald weapons just created too much chaos and while I liked the grenade colors themselves, again they just did not add anything to the scheme.


I took a few days of thinking with the occasional change being made as I went. I ended up using RMS Imperial Purple for the cloth color and did a gem style nightshade purple fade all the way to the brightest Amethyst Purple for the highlights. I also made the decision to stick with a more classic black high contrast weapon. In doing so I also tried a bright yellow weapon which ultimately (I didn't grab a picture of that mess!) got paint back over with VMC Black. 

The mask got a different treatment, which I while I was happy with the result, felt it was not bright enough for the rest of the scheme (as pictured below.) 

During all of this I realized (and it was pointed out a few times on forums!) a mold line I missed running half the length of the holster side of the body of the Sakiel, so it was going to head back to the a Simple Green dip for me to start over. My Cat thought it would be a good idea to encourage me to do so today by playing a quick game of swat my stuff off the table.


The damage wasn't bad after coming the 40" off my bench to wood floors as I would have thought, but it was getting a repaint to begin with, so its not sitting in a bath of simple green over night.

With that being said, I am happy with what I came out with for my scheme, its more akin to an organic Dark Elf style than I realized. They do stick out in a crowd (and on the table.)

Items I will concentrate more on when I start the Kaemel for the first "completed" model for this army are:

1) Increase the contrast of the yellow, I like the mid-tone and highlight I got to, but it really needs more depth added to it initially with some quick washes with a brownish paint.
2) Increase the brightness and contrast of the mask; I am not sure how just yet.
3) Watch those damn dainty mold lines!
4) Don't give up!

With the release of the ITS 2014 scenarios and formats I have made the choice to continue with my Nomads for the most part as my main army and paint my way through this year. Overall that will mean a Nomad model or two every week, with a Tohaa thrown in so I am painting red until my eyes cross.

Next up is a quick run down of the Nomads models that I have set up to be painted for this year, the scheme I settled on, the first test model and the 2nd.

Saturday, January 4, 2014

Tohaa: A Color Scheme

This past August, fellow gamer Todd won a Tohaa starter box at NOVA 2013. He graciously gifted (bartered!) it to me, as I had expressed interest in playing the faction (and it cut down on how much the split bill was in the end!) a few times.

While at NOVA I took advantage of TheWarStore.com being set up with a booth stocked with Infinity goodies and purchased a Chaksa boxset, Makauls Boxset, and a Gao Rael w/ Sniper rifle to get my force started.

Those models have since set in a box, waiting for a day when I felt likg modeling and painting them. That day is now (or about 14 days ago at this point!) and I have started with a test paint scheme on the Sakiel (which when I started with it, I had no real intention of using Sakiels in my lists, but then ITS 2014 came out and BAM! I need as much Viral as I can get, but that is for another post.)

Starting out, I struggled with the color scheme I wanted to use for my army. I am always the contrary type when it comes to official schemes, always waiting to do something different or at least flip major/minor colors around some. The Tohaa presented an interesting avenue to approach the scheme from, they are aliens and they have living things that provide armor for them (for some at least.) I searched  for inspiration among other Tohaa players armies, but never saw anything that sparked my interest. I broadened my search to just include a color that I wanted to work with, Purple. Again nothing really seemed to grab my attention as most of the schemes were very monochromatic. Finally I turned to nature and a silly debate with my fiance about if there were red and purple beetles. A quick Google search turned up such a beast and the inspiration for my Tohaa Army!

Meet Chrysochroa-Buqueti or the Banded Jewel Beetle.


This picture (and others like it) inspired what I am working on now. Executing against what I had envisioned in my minds eye on the other hand as been a very slow process. I am working with some hues I normally avoid like the plague (Yellow and Purple) so I first had to add more paints to my collection (never a bad thing if you ask me.) I purchased two RMS triads; the Royal Purples and the Dark Elf Flesh. The Royal purples will be used on the Armor and Symbiote while the Dark Elf flesh will be used on the Chaksa models skin to tie the army together but give the Chaksa a foreign look compared to the rest of the army.


I approached painting the Sakiel from the inside out, meaning I started with the inner most detail of the model. In this case it was the Symbiote, which I chose the Amethyst Purple as the initial mid-tone color. I washed all the areas with a watered down (with a mix of water and matte medium) coat of purple.

I then did a glaze of Imperial Purple and Liquitex glaze medium to darken the recesses more than the higher areas. I didn't get a picture of this step. I did layers of this, and then switched to the major armor flats. I picked out nightshade purple as the base to eventually create a high contrast dark to light transition, but here is the base coat step.


Also pictured are the kerf cut armor plates and what I view as lower support armor below the outer plates and on the feet. These were painted using a thinned layer of VMC German Gray.

After this I hit a hold point of sorts as I pondered what I wanted to paint the straps over the cloth and symbiote armor. I wanted to paint some sort of soft yellow, but being that I don't use those colors much, I had a small and very bright selection to choose from. I ended up taking a trip to local gaming/comic book store (Parker Banner Kent and Wayne) to look for paints.


This what I settled on, P3 Menoth White Base (a paint that I already had) and RMS Lemon Yellow. I applied a thinned layer (thinned with matte medium) of Menoth White Base followed by a thinned layer of RMS Lemon Yellow. I also followed through with the  Beetle scheme and base-coated the mask of the Sakiel with VMC Flat Red and washed it with Citadel Leviathan Purple Wash (Discontinued..sigh.)

All the paints I use to paint my Reds

That is far as my progress has gotten me to date. If you notice the leg on the left has the straps painted yellow and the cloth parts black. I am not sold on this part of the scheme yet. The weapons and accessories are still in the white, trying to decide what colors would go well (thinking a bright emerald type color for the weapons, but that also means I need to dig around for a green/turquoise paint or take another trip to the PBKW.

Continued in Part 2.

Sunday, December 22, 2013

Surroundings

Another goal I have been wanting to tackle for the last few months was my painting/modeling area. I have a small, but dedicated space for which to work on all my nerdish hobbies to my hearts content. That being said, I don't always use my space very well and in particular, I didn't have it lit very well.


I have always had some sort of desk to do hobby work on over the last 13 years. The best point being when I had a 4' double fluorescent light bar with daylight bulbs above my head for painting. I never had any light issues, but my current space doesn't allow me to hang that light bar, so it is packed away in the attic.

To help remedy that I went on a thrift shop hunt for a new (and cheap!) lamp. The first Goodwill stop had a $5 desk lamp that was only missing the clamp (that I can't use), that kind of luck never happens! Next stop was Lowes to grab a Reveal CFL to throw into it. The light cost more than the lamp, but I got a 26w (100w equivalent) White (Day) light. I got the CFL because it runs substantially cooler than the incandescent bulbs that I have used in the past, but the light works really well.

The Lamp was screwed down to the work surface allowing it to be swiveled to where it is needed, but still be above my head during use.

LIGHT!

I have my second light that is now pulling back lighting duty (that is a standard cold Fluorescent light that is still going strong after almost 10 years!)

The next thing that I had stopped using for a few years (mainly due to lack of desire to paint) was my wet pallet. I've had the case that I use that was I think originally from a cheap screw micro-screwdriver set that was purchased years ago at a Big-Box-Store.

Empty

It is about 3.5" x 8" on the inside, folding with a locking top. To that I took some closed cell foam from a Pelican Case I had laying around (denser than the foam that comes in the Infinity blister or box sets) and cut it to size.

Foamed

I placed a small amount of water in the bottom and allowed the foam to soak it up. It takes a little while for it to absorb water in compared to a lower density foam, but it also retains water for a long time afterwards. Next, a piece of parchment paper was cut to size to lay on top of the dampened foam. Speaking of the wetness level, its more about experience as to how much water needs to be in the foam for it to retain the moisture content of the paint, but not be so high that it thins the paint down way to much after it sits over night.

Parched

I pull the parchment paper over a table edge, applying light pressure at the corner to remove the roll that occurs straight from the box. This (which was done at the picture above) makes the paper lay flat so the paint stays put.

Finished!

As you can tell, the holidays are not being kind to my ability to work on modeling. Got behind already! More updates about the Skavens (There was a Warhammer Fantasy player at one of my local GWs back in the day that added a "S" to everything so the name as stuck ever since) Warband progress and what I am doing with my Tohaa and Nomads.

Sunday, December 8, 2013

Mouse Trap!

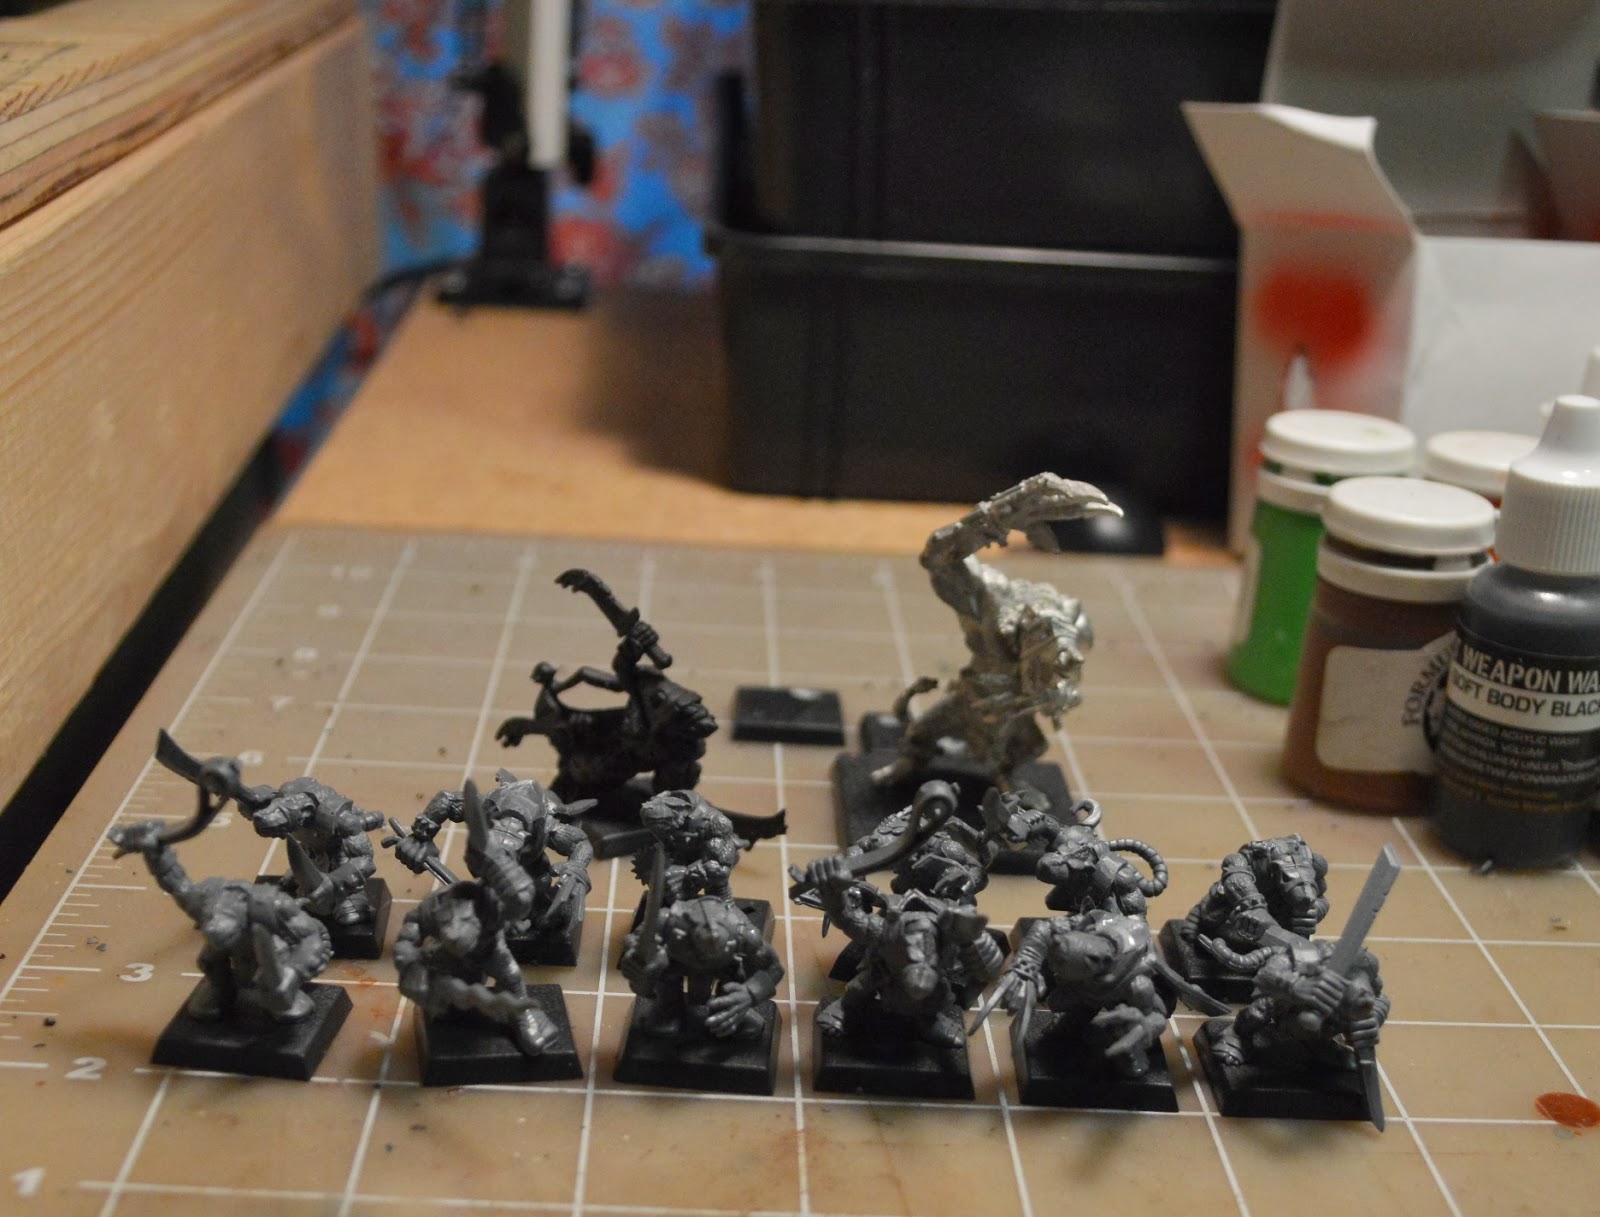
I got off to an early start gathering my Skaven warband together, assessing what needs to be done beyond what I had started originally. I own zero actual Mordheim-centric models and instead based my collection on the 6th edition plastics/metals that existed around the time I started playing (not to mention being significantly cheaper to purchase.)

My Main group of Skaven were formed around the purchase of a Gutter Runners boxset, the Skaven special character assassin Death Master Snikch, and a Single Rat Ogre model.

Group Shot (minus 2 models)

The only two models not pictured are the first standard Skaven with a sling and hand weapon I chose to start painting on about 2 months ago, which I completed over a two week span painting when I could sit down for 30 minutes or so so work on an area. The second model is the first Gutter Runner (for the warband all of the heroes are picked out by their capes or more notably their fighting claws.)

These models have been sitting cased for around 6 years (The last time I played Mordheim with any sort of regularity.) Modeling wise they were assembled with styrene glue and no mold lines were removed from the plastics. The metal models were pinned together and mold lines filed.

My plan is to work through all of the plastics, dealing with each model as I want to start painting it, removing it from the base (notice the two bases in the background?), placing a brass pin in one or both of the feet to aid in handling the model during painting (or lack therefore is a better way to say it.)  Each model will be primed using Krylon Flat White Primer.

I will go step by step on the first model and show all of the mold lines the lovely older style GW plastics gave us, removal of the mold lines, priming, and finally painting.

This is where the 2014 Goals begin to rear their heads. I did a bit of quick photography on the bench to grab some decent shots of the painted but not yet varnished Skaven Verminkin to see what I needed to do in order to show off whats there. The first plan that emerged will be the construction of a small light box that allows for finish photography. I used one in years prior and moving around it just go tossed in the garbage. The Nikon has 1,000 features and adjustments that can be used/made. I messed with shutter speed and Aperture for about 10 minutes and settled with what I have below. Lots more work and research to do on understanding close in miniature photography.


I use a mixture of two generations of GW paints/washes, P3, Reaper Master Series, Vallejo Game and Model Color, and some Testor Clears. Basically I use what colors from what brands that give me the best results in paint consistency. I use a single W&N Kolinsky Series 7 #1 brush for 95% of my work, shifting to a #0 on occasion if I can't reach something with the large diameter #1 (pretty rare nowadays)

I have another model that I am working on right now, I actually took the model apart at the waist to assist in painting its lower torso, then assembled the top half back on to finish (where I am at currently.) 

Just looking at what the camera shows, certain areas let me know here I got lazy on skipping some layers or if the paint consistency got too thin. A notable difference would be on the rear shot, the difference from the left side wrapping on the feet (claws!) as opposed to the right.

Modeling goal for the Skaven for the Dec 14th update is to complete Skaven Gutter Runner #1, and have the next Skaven ready for paint with the accompanied modeling and priming steps.

Saturday, December 7, 2013

Year One

I am already looking ahead to the release of the announced ITS 2014 rules and scenario. With that in mind and the coming holidays affording me more than normal free time a reboot of sorts I think is in order!


Bad Joke.. even Bob thinks so!

In all seriousness I have made a few goals for this year (including keeping this blog updated on a weekly basis to track my progress in modeling, painting, miniature photography (yeah that is something I want to work on too!)) and whatever I happen to stubble into along the way.


GOALS
  • Paint one model a week or more: My main goal going forward is to completely paint one model a week. It doesn't matter what model I paint, it can be from the dozen or so miniature games I play or just a random display model of the many I have accumulated over the years.


  • Enjoy the Above: I find myself thinking of painting over the last few years as a chore more than something I enjoy doing. Easing back into painting after more less zero brush time (other than the various spurts of muse that hits every few months) needs to be a process.


  • Photography: This is topic that has always frustrated me when it comes to miniature painting and trying to show off, but also ask for constructive criticism online. Conveying what you have painted, without covering up mistakes with the camera, but also no taking pictures that reveal flaws the human eye has little chance of seeing. I have upgraded my camera (not for miniature photography, but for general use) to a Nikon D3200 DSLR, now learning how to use it will be fun!


  • Improve My Painting Area: This is another thing that really needs work, I am lucky enough to have a dedicated space for my hobby. I utilize it poorly and the lighting conditions suck (I have one Fluorescent desk lamp above with white light and a clamp one with warm-light.) My plan is to add an additional desk lamp like the one I have throwing light from the opposite direction to get more even coverage. Over the year my eyes have gone from being able to stare at things 6" from my face for hours, to generating headaches after 30 minutes concentrating on all the detail present in modern metal/plastic/resin miniatures.


  • Maintain the blog: Keeping this blog is my only way of self policing what I need to get done. Generating these posts is my reward of sorts, I could spend hours discussing all things modeling.


  • Play more Consistently, don't just play: This speaks to how I go through spurts of availability for gaming and then what I do when I play. Having a goal in mind when playing with various lists (Mainly for Infinity..) I lately just toss a list together and roll with it. Trying out things I normally don't use (I have used AD: Combat Jump exactly once in 1.5 years of Infinity)


  • Bat-Rep: This has been another topic of discussion among my player group and we never seem to have the stamina (or the memory) to get a good battle report together to publish online. I would like to do one monthly at this point.
Beyond the above goals I will be working on various lists for local player and for NOVA 2014 (9 months seems like a long time, I said that last year and barely got all the models I wanted to use based with my overly complicated plasti-card bases.) I picked up the basis for a Tohaa Army at NOVA 2013, and I own a large majority of the Nomad Line at this point. My Local lists will mainly consist of Sectorials for Nomads, concentrating more on Bakunin and a Tohaa Gun Line list (lots of spitfires *GRIN*) which may or may not get actual use for the upcoming ITS season.

Another area of interest that has come and gone are the GW (*GASP*) games; Mordheim and Necromunda. 

Mordheim is the game that started it all for me way back in 1999. A local GW (since closed) and a demo of Skaven VS Humans is what sparked my interest in this hobby. I still have my Skaven Warband that I have used for years, but never actually painted, until now. These are the models that I have been using to rebuild my painting technique on over the last few months and what I am going to use for the month of December to learn about my camera. That said, I have painted one model to date and am about 40% complete on a second model.

The other game (and miniatures) I am going to dabble in (to paint human skin mainly) are my Goliaths for Necromunda. I have the more modern set, not the old style plastics. I named them all after gun manufacturers and will go through some of the conversions I did to represent some of the antics that happened during a half dozen campaigns over the years.

To close, the model I am most proud of (and since has been knocked around by my cat, breaking it :( ) The Cold Zombie:


Another Model I have stuck away for a game called Foresaken that was developed locally:


The next installment will be centered around my Skaven warband; All things painting and updates on my goals (To keep myself honest, the weekend of December 14th being the goal for the blog update)


Monday, July 22, 2013

I think an update on where I am at in trying to prepare for the NOVA ITS Tournament (Hunger games and the Team Tournament too!) Myself and another player in my local gaming group (The Dread Gamer Todd, if your on the infinity forum you know what I am talking about) have been playing with some of the theorized lists that would seem to be rather hard to deal with (First Turn TAG Lieutenant alpha-stirkes and Preta Spam so far.)

I'll explain the Preta Spam first with a little bit of history (from 2 months ago I believe) about how Pretas (of the Combine army) came to lose their biomines and gain just regular mines... well I really have no idea, it just happened.

Now there is a 5 point model that is impetuous and has mines running around. We theorized a list that ran 8-10 of the could be a real pain to deal in regards to the ITS (any of the token scenarios and front-line especially.)

We both made lists (I used a list for supply run that I have been working on getting comfortable with to play at NOVA and Todd made a Preta Spam list.) We played two games (ah yes super small sample size) with the same lists both knowing exactly what the other had from the get to. First game the Preta list got first turn, then it basically flooded the board with mines using coordinated orders to limit the ARO exposure and take 2 of the 3 supply boxes. I was a complete loss as how to get through the 2 dozen or so mines that made it onto the board IN ONE TURN (mine sweeper/Engineers). I lost that game before I even got to go. Keep in mind there was still 260 points worth of army still pointing HMGs, etc at me. Now we just flip-flopped who went first in the same scenario. Basically, a Spitfire equipped Prowler mowed down the Pretas and all of the Major ARO threats. I grabbed all 3 boxes and got ready to weather the counter attack that never came. During the course of the Prowlers shooting spree I had taken out Todd's Lieutenant buying me time to secure the boxes in hard to reach areas going for the win. This game was a result of the terrain density and the quanitity of models to get into cover not working out.

Our conclusion is that 1st turn is super important and that leads into the next thing we started messing around with: 1st Turn Lieutenant Tag Alpha-Strike. We took turns (I choose the Avatar; Todd the Marut.) In both cases we "assumed" that the TAG Lieutenant side won initiative. Not a far stretch for the Avatar with WIP 17 and the Marut's WIP of 15. Todd played an army he was looking to use for the NOVA ITS and I went after him with the Avatar. I could only get one supply box, but managed during the process to take out his Lieutenant, 2 Kaplans, a HMG total reaction remote and put two wounds on Scarface. So he was hurting on his first turn right from the get go and we called it to switch. He did managed to ARO hack the Avatar and immobilize it during my last order.

Now with Todd in control of an Aleph group with a Marut in the lead, I choose a list similar to one I usually play a variation of for most objective type scenarios with the twist of having as many Total Reaction or Neuroscientics models as I could to see if an offensice reactive turn could stop the alpha-strike. First turn saw common use of smoke covered movement and smoke/shooting that left all but one defensive model out of the game. Todd had secured two boxes and the Marut had taken to wounds (from criticals from a TR combi-rifle at 32"..) I then tried to counter but the boards we played on (very similar density from what we've seen posted at other ITS events) did not allow me to move without getting into a TR firelane of some sort and my attempt the hack the Marut failed. After that the Marut was in a position to be repaired and most of Todd's Aleph force was still intact (I think I took out a yudbot and a thorikite) and mine was missing a good chunk of my heavy weapons due to being shot apart as part of my attempt to stop the Marut.

The conclusion we came to was you can not build a defensive list that will be strong enough to stop an alpha-strike reliably and will leave you weak in the offensive capability side of things. My preparation has turned my lists over a little bit, adding more active turn bite, and reducing the amount of reactive turn offensive threats. My thought process is being prepared on your active turn if you go 2nd to take out the 110+ alpha strike model with the use of hacking or concentrated fire to remove the threat. Now if your opponent is playing convservatively enough that they are happy with 1-2 boxes and they secure the alpha-strike model back into Total Cover you are going to have a tough time digging that model out with taking heavy losses.