Sunday, December 22, 2013

Surroundings

Another goal I have been wanting to tackle for the last few months was my painting/modeling area. I have a small, but dedicated space for which to work on all my nerdish hobbies to my hearts content. That being said, I don't always use my space very well and in particular, I didn't have it lit very well.


I have always had some sort of desk to do hobby work on over the last 13 years. The best point being when I had a 4' double fluorescent light bar with daylight bulbs above my head for painting. I never had any light issues, but my current space doesn't allow me to hang that light bar, so it is packed away in the attic.

To help remedy that I went on a thrift shop hunt for a new (and cheap!) lamp. The first Goodwill stop had a $5 desk lamp that was only missing the clamp (that I can't use), that kind of luck never happens! Next stop was Lowes to grab a Reveal CFL to throw into it. The light cost more than the lamp, but I got a 26w (100w equivalent) White (Day) light. I got the CFL because it runs substantially cooler than the incandescent bulbs that I have used in the past, but the light works really well.

The Lamp was screwed down to the work surface allowing it to be swiveled to where it is needed, but still be above my head during use.

LIGHT!

I have my second light that is now pulling back lighting duty (that is a standard cold Fluorescent light that is still going strong after almost 10 years!)

The next thing that I had stopped using for a few years (mainly due to lack of desire to paint) was my wet pallet. I've had the case that I use that was I think originally from a cheap screw micro-screwdriver set that was purchased years ago at a Big-Box-Store.

Empty

It is about 3.5" x 8" on the inside, folding with a locking top. To that I took some closed cell foam from a Pelican Case I had laying around (denser than the foam that comes in the Infinity blister or box sets) and cut it to size.

Foamed

I placed a small amount of water in the bottom and allowed the foam to soak it up. It takes a little while for it to absorb water in compared to a lower density foam, but it also retains water for a long time afterwards. Next, a piece of parchment paper was cut to size to lay on top of the dampened foam. Speaking of the wetness level, its more about experience as to how much water needs to be in the foam for it to retain the moisture content of the paint, but not be so high that it thins the paint down way to much after it sits over night.

Parched

I pull the parchment paper over a table edge, applying light pressure at the corner to remove the roll that occurs straight from the box. This (which was done at the picture above) makes the paper lay flat so the paint stays put.

Finished!

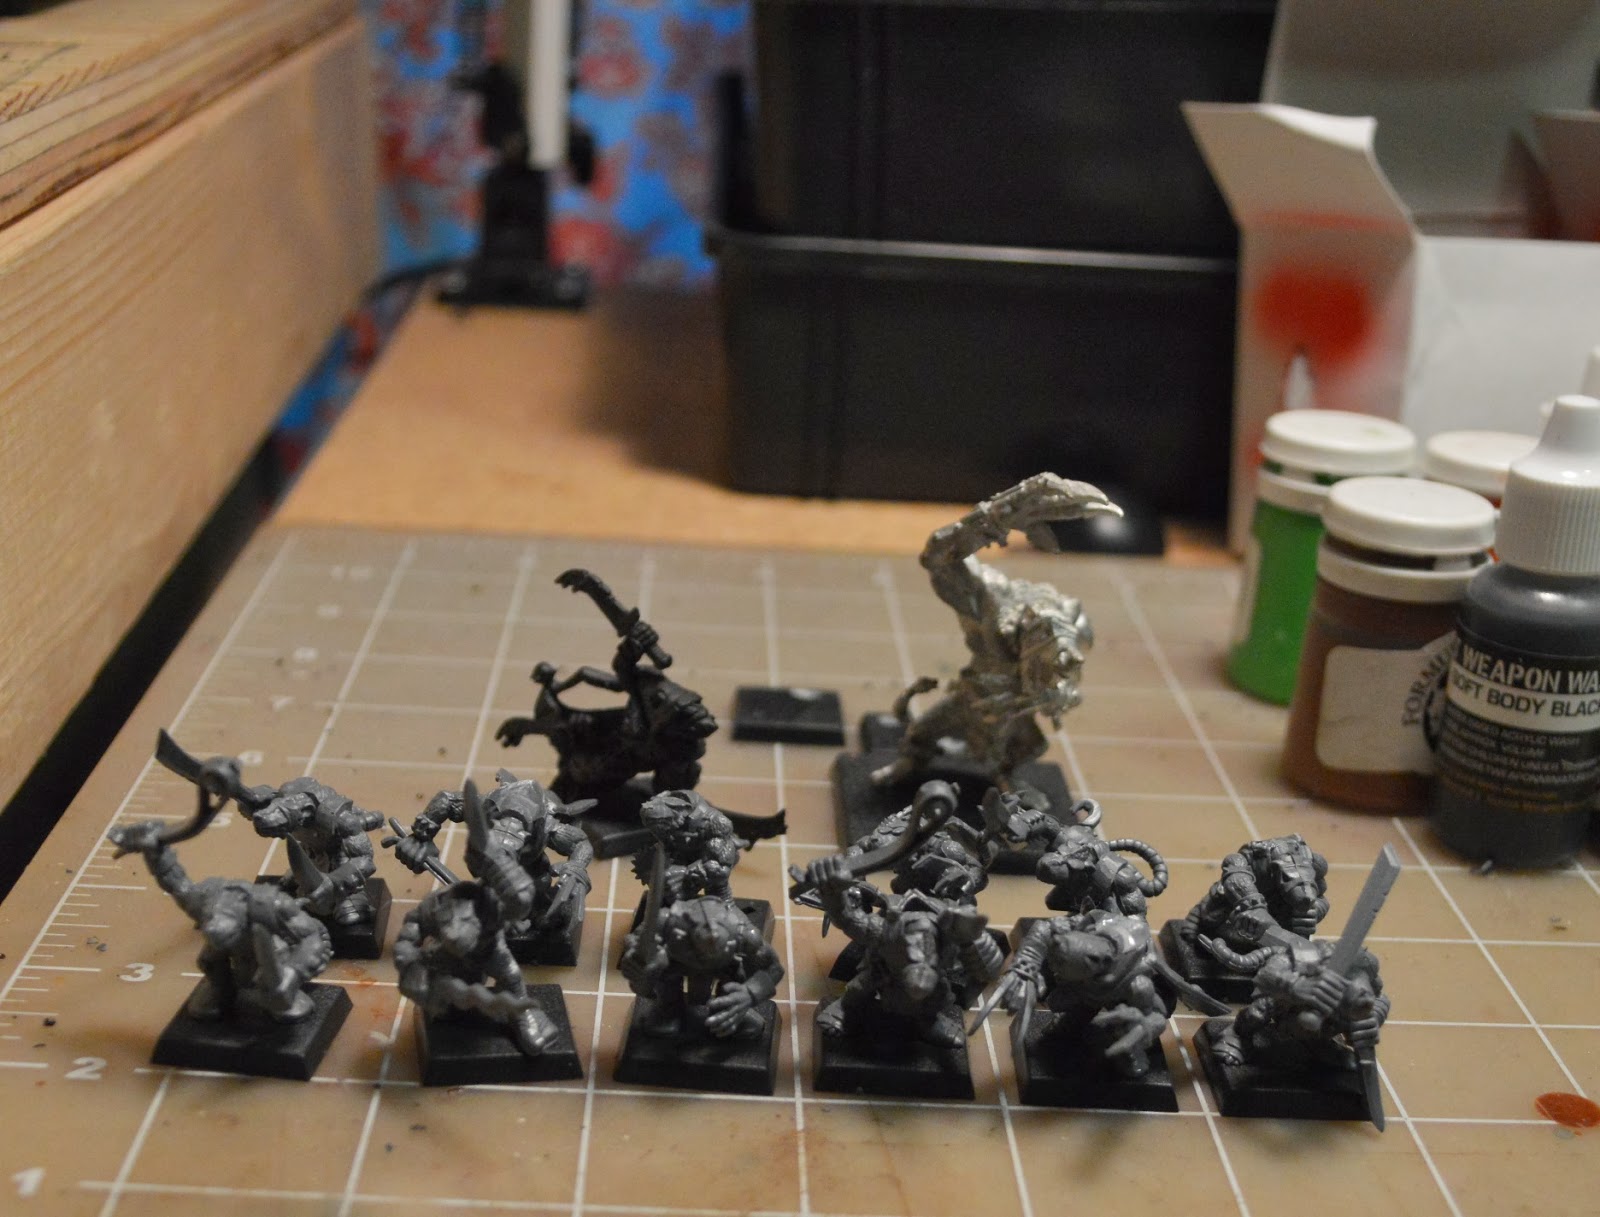
As you can tell, the holidays are not being kind to my ability to work on modeling. Got behind already! More updates about the Skavens (There was a Warhammer Fantasy player at one of my local GWs back in the day that added a "S" to everything so the name as stuck ever since) Warband progress and what I am doing with my Tohaa and Nomads.

Sunday, December 8, 2013

Mouse Trap!

I got off to an early start gathering my Skaven warband together, assessing what needs to be done beyond what I had started originally. I own zero actual Mordheim-centric models and instead based my collection on the 6th edition plastics/metals that existed around the time I started playing (not to mention being significantly cheaper to purchase.)

My Main group of Skaven were formed around the purchase of a Gutter Runners boxset, the Skaven special character assassin Death Master Snikch, and a Single Rat Ogre model.

Group Shot (minus 2 models)

The only two models not pictured are the first standard Skaven with a sling and hand weapon I chose to start painting on about 2 months ago, which I completed over a two week span painting when I could sit down for 30 minutes or so so work on an area. The second model is the first Gutter Runner (for the warband all of the heroes are picked out by their capes or more notably their fighting claws.)

These models have been sitting cased for around 6 years (The last time I played Mordheim with any sort of regularity.) Modeling wise they were assembled with styrene glue and no mold lines were removed from the plastics. The metal models were pinned together and mold lines filed.

My plan is to work through all of the plastics, dealing with each model as I want to start painting it, removing it from the base (notice the two bases in the background?), placing a brass pin in one or both of the feet to aid in handling the model during painting (or lack therefore is a better way to say it.)  Each model will be primed using Krylon Flat White Primer.

I will go step by step on the first model and show all of the mold lines the lovely older style GW plastics gave us, removal of the mold lines, priming, and finally painting.

This is where the 2014 Goals begin to rear their heads. I did a bit of quick photography on the bench to grab some decent shots of the painted but not yet varnished Skaven Verminkin to see what I needed to do in order to show off whats there. The first plan that emerged will be the construction of a small light box that allows for finish photography. I used one in years prior and moving around it just go tossed in the garbage. The Nikon has 1,000 features and adjustments that can be used/made. I messed with shutter speed and Aperture for about 10 minutes and settled with what I have below. Lots more work and research to do on understanding close in miniature photography.


I use a mixture of two generations of GW paints/washes, P3, Reaper Master Series, Vallejo Game and Model Color, and some Testor Clears. Basically I use what colors from what brands that give me the best results in paint consistency. I use a single W&N Kolinsky Series 7 #1 brush for 95% of my work, shifting to a #0 on occasion if I can't reach something with the large diameter #1 (pretty rare nowadays)

I have another model that I am working on right now, I actually took the model apart at the waist to assist in painting its lower torso, then assembled the top half back on to finish (where I am at currently.) 

Just looking at what the camera shows, certain areas let me know here I got lazy on skipping some layers or if the paint consistency got too thin. A notable difference would be on the rear shot, the difference from the left side wrapping on the feet (claws!) as opposed to the right.

Modeling goal for the Skaven for the Dec 14th update is to complete Skaven Gutter Runner #1, and have the next Skaven ready for paint with the accompanied modeling and priming steps.

Saturday, December 7, 2013

Year One

I am already looking ahead to the release of the announced ITS 2014 rules and scenario. With that in mind and the coming holidays affording me more than normal free time a reboot of sorts I think is in order!


Bad Joke.. even Bob thinks so!

In all seriousness I have made a few goals for this year (including keeping this blog updated on a weekly basis to track my progress in modeling, painting, miniature photography (yeah that is something I want to work on too!)) and whatever I happen to stubble into along the way.


GOALS
  • Paint one model a week or more: My main goal going forward is to completely paint one model a week. It doesn't matter what model I paint, it can be from the dozen or so miniature games I play or just a random display model of the many I have accumulated over the years.


  • Enjoy the Above: I find myself thinking of painting over the last few years as a chore more than something I enjoy doing. Easing back into painting after more less zero brush time (other than the various spurts of muse that hits every few months) needs to be a process.


  • Photography: This is topic that has always frustrated me when it comes to miniature painting and trying to show off, but also ask for constructive criticism online. Conveying what you have painted, without covering up mistakes with the camera, but also no taking pictures that reveal flaws the human eye has little chance of seeing. I have upgraded my camera (not for miniature photography, but for general use) to a Nikon D3200 DSLR, now learning how to use it will be fun!


  • Improve My Painting Area: This is another thing that really needs work, I am lucky enough to have a dedicated space for my hobby. I utilize it poorly and the lighting conditions suck (I have one Fluorescent desk lamp above with white light and a clamp one with warm-light.) My plan is to add an additional desk lamp like the one I have throwing light from the opposite direction to get more even coverage. Over the year my eyes have gone from being able to stare at things 6" from my face for hours, to generating headaches after 30 minutes concentrating on all the detail present in modern metal/plastic/resin miniatures.


  • Maintain the blog: Keeping this blog is my only way of self policing what I need to get done. Generating these posts is my reward of sorts, I could spend hours discussing all things modeling.


  • Play more Consistently, don't just play: This speaks to how I go through spurts of availability for gaming and then what I do when I play. Having a goal in mind when playing with various lists (Mainly for Infinity..) I lately just toss a list together and roll with it. Trying out things I normally don't use (I have used AD: Combat Jump exactly once in 1.5 years of Infinity)


  • Bat-Rep: This has been another topic of discussion among my player group and we never seem to have the stamina (or the memory) to get a good battle report together to publish online. I would like to do one monthly at this point.
Beyond the above goals I will be working on various lists for local player and for NOVA 2014 (9 months seems like a long time, I said that last year and barely got all the models I wanted to use based with my overly complicated plasti-card bases.) I picked up the basis for a Tohaa Army at NOVA 2013, and I own a large majority of the Nomad Line at this point. My Local lists will mainly consist of Sectorials for Nomads, concentrating more on Bakunin and a Tohaa Gun Line list (lots of spitfires *GRIN*) which may or may not get actual use for the upcoming ITS season.

Another area of interest that has come and gone are the GW (*GASP*) games; Mordheim and Necromunda. 

Mordheim is the game that started it all for me way back in 1999. A local GW (since closed) and a demo of Skaven VS Humans is what sparked my interest in this hobby. I still have my Skaven Warband that I have used for years, but never actually painted, until now. These are the models that I have been using to rebuild my painting technique on over the last few months and what I am going to use for the month of December to learn about my camera. That said, I have painted one model to date and am about 40% complete on a second model.

The other game (and miniatures) I am going to dabble in (to paint human skin mainly) are my Goliaths for Necromunda. I have the more modern set, not the old style plastics. I named them all after gun manufacturers and will go through some of the conversions I did to represent some of the antics that happened during a half dozen campaigns over the years.

To close, the model I am most proud of (and since has been knocked around by my cat, breaking it :( ) The Cold Zombie:


Another Model I have stuck away for a game called Foresaken that was developed locally:


The next installment will be centered around my Skaven warband; All things painting and updates on my goals (To keep myself honest, the weekend of December 14th being the goal for the blog update)